

Import flow
The design system import flow turns your component library, and optionally your design tokens, into components and design tokens in Contentful. You start it by choosing Import on the CLI home screen. From there, the CLI guides you through each step on screen. It reads your components, uses your coding agent to suggest which ones to include and to generate their definitions, and lets you review and edit the results. When you finish, it saves the results to your computer, compares them with your Contentful space, and pushes them after you confirm a preview.
This guide explains each step, so you know what to expect and where you can make changes. To run your first import, see Getting started.
How the flow is organized
At the top of every screen, the CLI shows your progress across six stages: Setup, Extract, Select, Generate, Review, and Push. This guide follows the same stages.
The first screen asks what you want to import, and your answer decides which steps you see:
- Design tokens and components. You see every step.
- Components only. You skip the steps that work on design tokens.
- Design tokens only. You skip the steps that work on components. The CLI asks for your token file and your credentials, converts and reviews the tokens, then saves and pushes them.
The steps run in this order:
Setup
- Choose what to import.
- Enter your project path. Skipped for a tokens-only import.
- Enter your token file. Skipped for a components-only import.
- Confirm the files to scan. Skipped for a tokens-only import.
- Enter your Contentful credentials.
Extract
- Read your project.
- Review design tokens. Skipped for a components-only import.
Select
- Choose which components to import. Skipped for a tokens-only import.
Generate
- Generate component definitions. Skipped for a tokens-only import.
Review
- Review the generated definitions. Skipped for a tokens-only import.
Push
- Save, preview, and push.
Two of these steps use your coding agent: reading your project (step 6), which includes converting your tokens, and generating component definitions (step 9). They use the default agent you set in Settings > Configuration > Agents.
Next: The next section covers the Setup stage, where you tell the CLI what to import.
Setup
In the Setup stage, you tell the CLI what to import, where to find it, and which Contentful space to import it into.
1. Choose what to import
The first screen asks what you want to import: design tokens and components, design tokens only, or components only. It also lists the stages you will go through, and marks the ones that use your coding agent.
2. Enter your project path
Enter the path to the root folder of your component library. The path can be absolute, relative, or start with ~, and it must be a folder, not a file. The CLI skips this step for a tokens-only import.
3. Enter your token file
Design tokens are the colors, spacing, typography, and other styling values in your design system. Importing them is optional: to leave tokens out, choose Components only on the first screen. The CLI skips this step for a components-only import.
If you import tokens, the CLI asks for the path to your token file. The path can be absolute, relative, or start with ~, and it must point to a single file, not a folder.
These file formats work:
- SCSS and CSS variables
- JavaScript and TypeScript token files
- Style Dictionary files
- Tailwind config files
- JSON in any structure
The import converts your tokens to the W3C DTCG format. It then maps them to components. If a component has a design property for color, spacing, or another style, the import links it to the matching tokens. For example, a backgroundColor property can use tokens from your color group.
4. Confirm the files to scan
The CLI scans your project folder for .tsx, .ts, .jsx, .js, .vue, .svelte, and .astro files and shows how many files of each type it found, including any .json token files. You confirm the list before the CLI continues. If it finds no component files, it asks you to try a different path. The scan skips type declaration files (.d.ts), stories, tests, and specs, and folders such as node_modules, dist, and build. The CLI skips this step for a tokens-only import.
5. Enter your Contentful credentials
The CLI asks for your space ID, environment ID, a Contentful management API token, and the API host. If you saved these in Settings > Configuration > Project, the screen is pre-filled. The CLI checks the credentials before it continues. If the check fails, you see the error and can edit the values or go back.
Credentials are required. The credentials screen has no option to skip it. They come before the CLI reads your project because the CLI uses your space to check which components already exist.
Next: With your setup complete, the CLI starts reading your project. The next section covers the Extract stage.
Extract
In the Extract stage, the CLI reads your project and, if you chose tokens, converts your token file.
6. Read your project
While a progress screen shows, the CLI does several things at the same time:
- Reads your components. It finds components, their properties, and their slots in your files.
- Reads your space. It fetches the components and design tokens that already exist in your Contentful space, so it can compare them with your import.
- Suggests exclusions. Your coding agent suggests components to leave out of the import. These are usually hooks, context providers, and wrappers with no visible UI. Nothing is excluded yet; you decide in the Select stage.
- Converts your tokens. If you chose tokens, your coding agent converts your token file to the W3C DTCG format.
7. Review design tokens
If you imported tokens, the Review design tokens screen shows the tokens your coding agent generated. Because an agent does the conversion, this is where you catch anything that was converted wrongly. The CLI skips this step for a components-only import.
Next: Once the CLI has read your project, you choose which components to import. The next section covers the Select stage.
Select
In the Select stage, you decide which components the import includes.
8. Choose which components to import
The agent’s suggestions appear next to the full list of components.
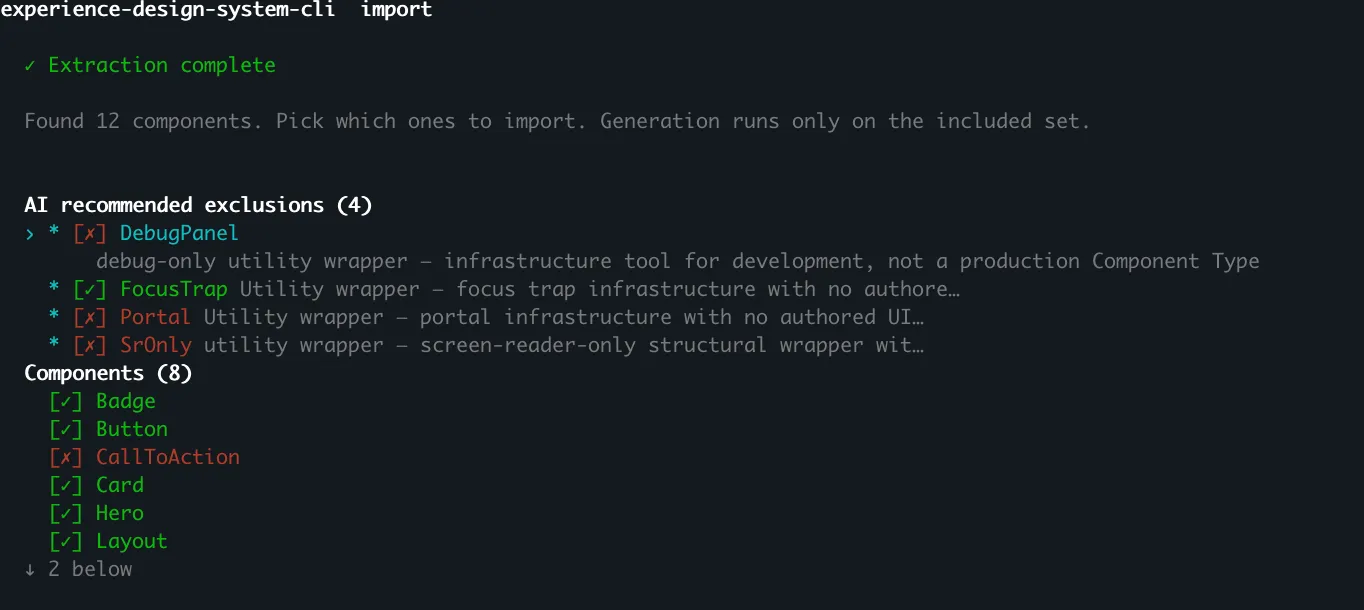
On this screen you can:
- Read the agent’s reason for each suggestion.
- Include or exclude any component, one at a time or all at once.
Generation starts when you confirm your choices.
Next: After you confirm, the CLI generates definitions for the components you chose. The next section covers the Generate stage.
Generate
9. Generate component definitions
Your coding agent generates a definition for each component you chose. A progress screen shows while it runs, and it takes a few minutes.
Next: When generation finishes, you review the result. The next section covers the Review stage.
Review
10. Review the generated definitions
This screen shows each generated component, with its properties and slots, and the agent’s reasons for keeping or leaving out each one.
You can:
- Read the agent’s reasons for each component and property.
- Accept or reject each component, or accept all of them.
- Edit fields. Change names, descriptions, types, defaults, and allowed values.
- View the source code snippet for a component.
- View the JSON definition.
- Review mapped tokens. If you imported tokens, press
tto see which tokens the import linked to a component’s design properties. - Check for problems. See breaking changes against what is already in Contentful and slot cycles between components.
- Undo and redo your edits.
Press h on the screen to see every shortcut.
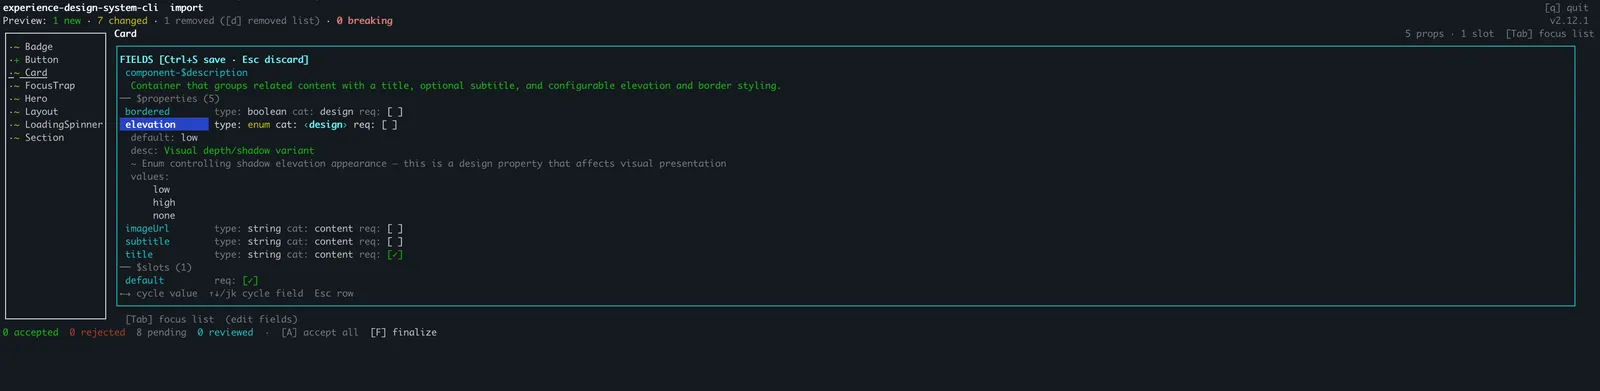
When you finish, press F to finalize. Your edits are included in the saved file and the push.
Next: After you finalize, the CLI saves your files and pushes them. The next section covers the Push stage.
Push
11. Save, preview, and push
After the review, the import asks where to save your files. It always saves components.json to your computer, and then pushes to Contentful.
Before anything is pushed, you see a summary of what will be created, updated, and skipped. You can expand it to see every field that changes.
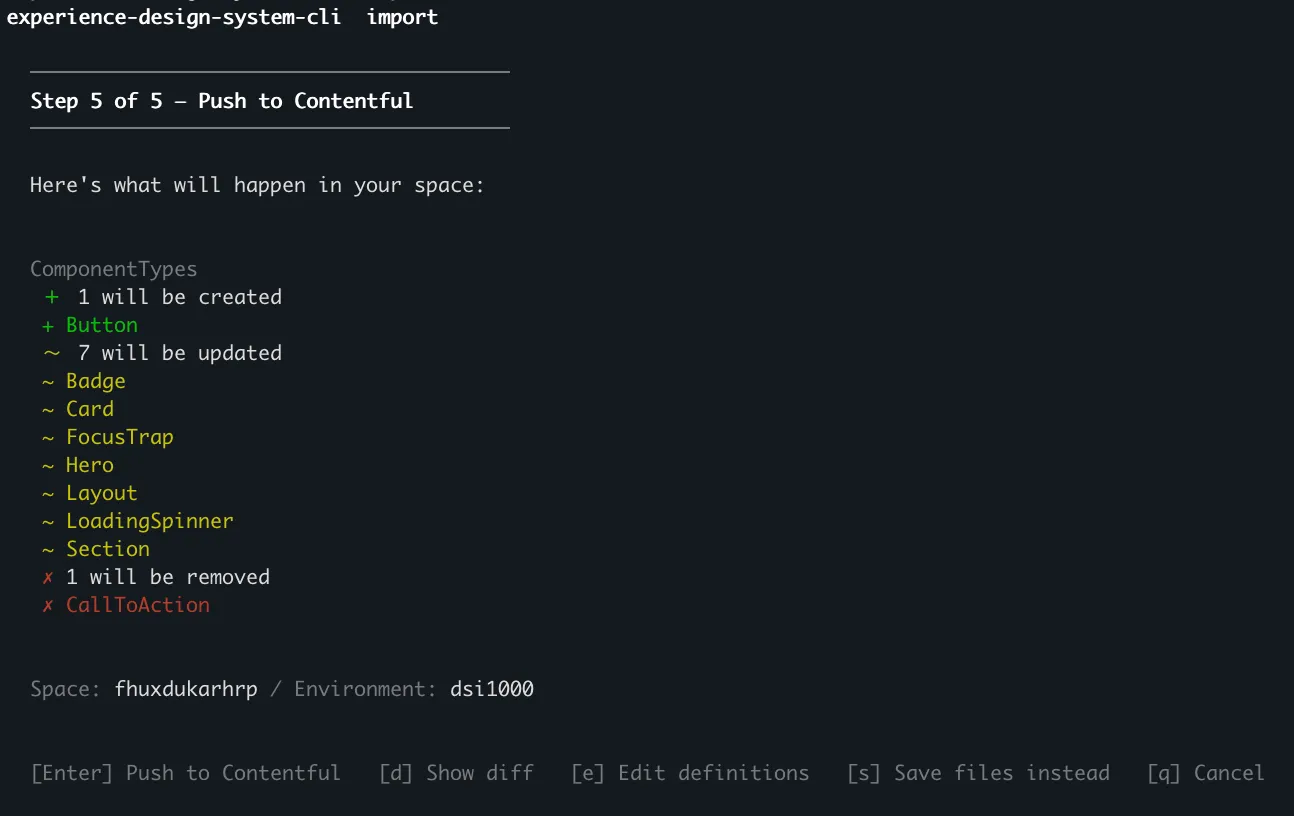
The summary also lists components that are in your space but not in your import. Read the whole summary before you confirm, and cancel if a component you want to keep is on it.
When the push finishes, the CLI prints a summary and a link to your components. To find them yourself, see Getting started.
Push a saved file later
Pushing a saved components.json at a later time isn’t supported yet. The CLI has no command that takes a saved file and pushes it, and every import generates new files from your code. It doesn’t reuse files from an earlier run. To push, run the import again and complete it with valid credentials.
Next: You will probably import more than once. The next section covers what to expect.
Run the import again
To import again, choose Import on the CLI home screen. If the CLI is closed, start it with experiences import first. Every run generates new results from your code and does not reuse results from an earlier run.
To change the coding agent the import uses, open Settings > Configuration > Agents on the home screen.
Next steps
- Command reference — Learn how to start the CLI, and understand the Settings menu.
- FAQ — Find answers to common questions.